EasySoak watering systems are the cheapest and most economical systems offered by Sustainable Village. They are also the most simple and easy to configure!
In Concept

In concept, EasySoak systems are lengths of BluSoak drip tape that are preceded by flow controllers or restrictors. The flow controllers/restrictors control the volume of water going into the tape, and therefore the garden. Thus, a gardener can deliver a pre-determined volume of water to a garden using EasySoak systems.
These systems are conventional drip irrigation systems, and are incredibly user-friendly and convenient.
Timers can be used in addition to flow controllers to have greater control over irrigation. For example, if I wanted to deliver 10 gallons per day to a raised bed, I could use a flow controller with a rate of 1 gallon per hour, and run the system on a timer for 10 hours a day to accomplish this. Alternatively, one could use a 0.5 gallon per hour flow controller, and run the system 20 hours a day, etc.
Configuring Your Own System
Tools for the Job
- BluSoak Drip Tape
- Flow Controller(s)
- Fittings, Tubing, and Garden Hose
- Timer (optional)
The four items above are all that are needed for an EasySoak system! The hardest part is figuring out which flow controller(s) you might need, and whether you’d like a timer or not.
Step 1: Design Layout & Calculate Tape
To calculate how much drip tape you’ll need, you’ll want to calculate the square footage of your garden area. EasySoak systems can be used in containers as well, but are easiest to configure for garden beds or raised beds. We recommend about a foot between tape rows, and roughly 1 foot of tape per square foot of garden area.
See below for example tape configurations, any of which could work:
![]()
![]()
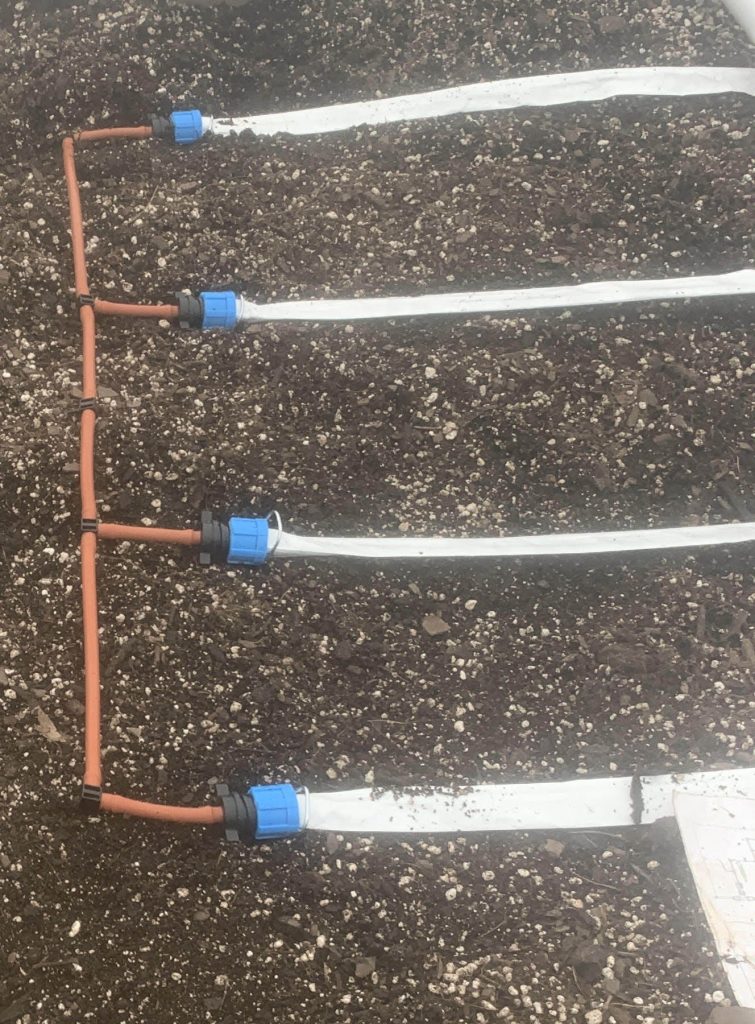
Once you have your designs, you can calculate your total footage of tape needed, as well as necessary fittings like end plugs and tubing adapters.
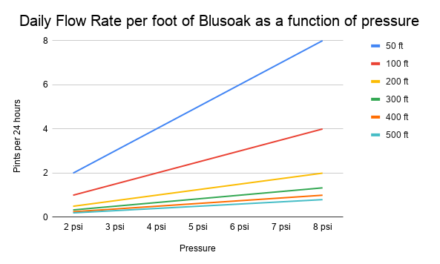
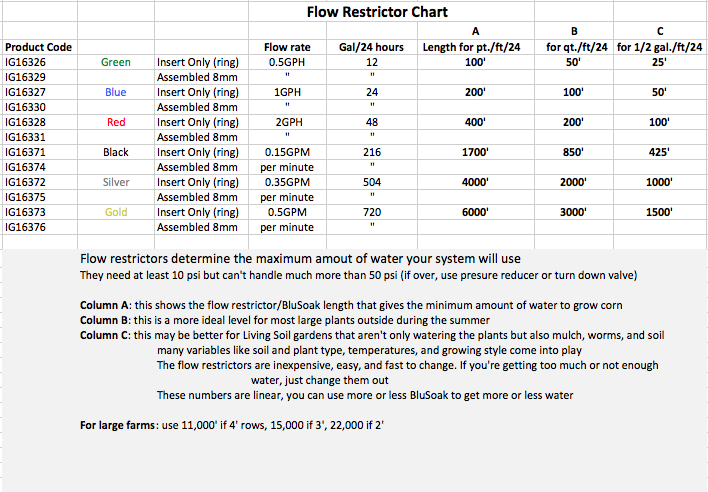
Step 2: Choose Flow Controller(s)
Flow controller choice depends on the length of tape, and desired volume of water to be delivered. Here is a useful table for choosing flow controllers based on the flow rates of each controller, and recommended lengths of tape:
If you’re between sizes and aren’t sure, you have a couple options:
- “Upsize” to the larger-volume flow controller, and use a timer to prevent excess watering
- Use the lower-volume flow controller for Spring, species with low water-demand, and/or wetter climates
- Use the higher-volume flow controller for Summer, species with high water-demand, and/or dryer climates
You’ll have to consider the conditions of your own garden and convenience if you’re between flow controllers. It’s a bit like choosing clothing size–some folks err large, others small, but it’s ultimately a personal preference.
Step 3: Determine Necessary Accessories
There are myraid ways to configure an easysoak system, with just as many appropriate accessories. We’ll go through a few examples to clarify how you’ll configure things.
If coming from 1/2″ drip line for example, you’d need:
- 1/2″ x 1/2″ x FHT Tee
- MHT x 8mm Adapter
- Flow Controller Ring
- 8mm tubing to reach from 1/2″ tubing up to Tape Adapter(s)
- 8mm x Tape Adapter(s)
- Tape
- Tape Flush Plug
- (Optional) 8mm Tees or 8mm Y Fittings for multiple tape lengths
- (Optional) Tape Hold-Down Stakes
If coming from a hose bibb or garden hose for example, you’d need:
- FHT x 8mm Adapter
- Flow Controller Ring
- 8mm tubing to reach from flow controller 8mm barb to 8mm x Tape Adapter(s)
- 8mm x Tape Adapters
- Tape
- Tape Flush Plug
- (Optional) 8mm Tees or 8mm Y Fittings for multiple tape lengths
- (Optional) Tape Hold-Down Stakes
Step 4: Configure Timer (Optional)
If you are in a wetter time of season, have smaller plants, or like to deliver water at strategic times (some gardeners prefer night or morning watering to minimize evaporation loss, etc.), you may want to use a timer in addition to a flow controller. A timer makes your EasySoak system more versatile and adaptable to varying conditions.
Timers can be used, as previously suggested, to alter total flow rates as well. For example, if your flow controller allows for 1 gallon per hour but you want to deliver roughly a third of that volume, you could configure a timer to deliver water for 8 hours a day, while turning supply off for the remaining 16. You could even parse the delivery out in intervals, for example 4x 2-hour periods per day, for a total of 8 hours.
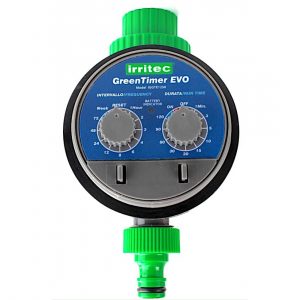
Timers allow for more customization and optimization of an EasySoak system. We recommend this timer, which can work with rain barrels or gravity feeds and has no minimum pressure requirement:
Step 5: Operate & Adjust
As you watch your EasySoak system operate, you’ll want to make adjustments. As Summer comes along, temperatures will increase and plants will grow–they will want more water! You can adjust for this by using a timer, as previously mentioned, or by swapping out your flow controller(s) for a controller that allows higher volumes of water.
You’ll get a feel for the rhythms of your garden, plants, and season, and will be adjusting your EasySoak system to work perfectly for you and your plants accordingly. Enjoy the journey!