
Assembling Your Grassroots Raised Bed
Setting up your Grassroots Raised Bed is fairly easy – but we want to make sure you have all the instructions you need to assemble it correctly.
We recommend watching this video first before buying and cutting your 1 inch PVC piping.
Supplies that you’ll need:
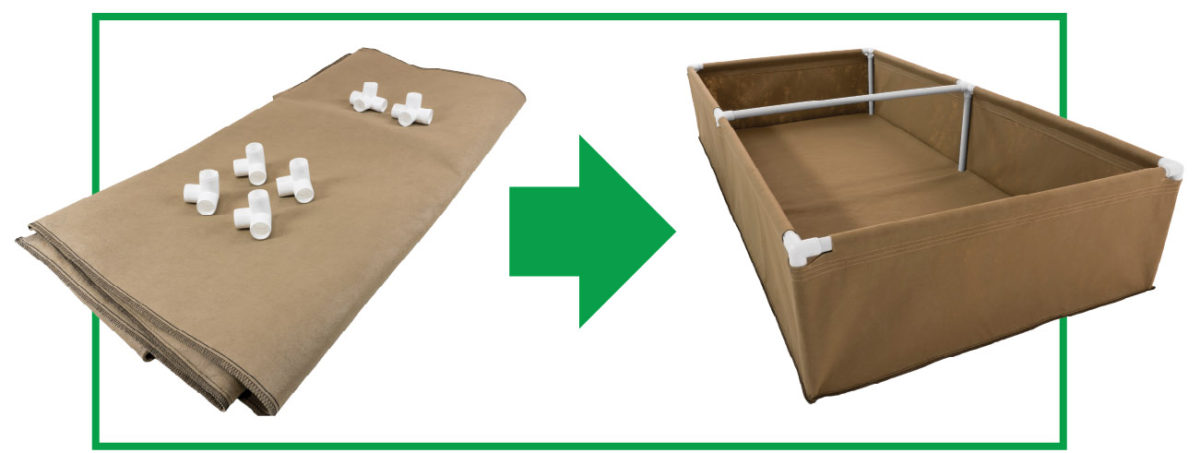
- A Grassroots Fabric Raised Bed
- PVC Fittings
- 1″ PVC Pipe
- PVC Pipe Cutter
- Mallet (recommended) or Hammer
- File or Sandpaper (optional)
*Please note for the single trellis you will need to add 4 x (desired trellis height) for total PVC pipe needed, and for the double trellis add 4 x (desired 1st trellis height) + 4 x (desired 2nd trellis height) for total PVC pipe needed.
For example: Let’s say you have a 2′ x 4′ raised bed with a double trellis, and you want your first trellis to be 2 feet high and your second trellis to be 3 feet high. The amount of PVC you will need to purchase is 40ft + (4 x 2) + (4 x 3) = 60 feet
Step by Step Guide to Assembly
1. Start with the bed on a flat surface.
2. Lay a piece of PVC across the bed so it starts flush with the end.
3. Cut the PVC where it meets the horizontal sharpie line near the top of the side.
4. This piece will become a leg. You can now cut the rest of the legs to this length. There will be one leg for every notch.
5. Put the proper fittings on to the legs. We will attach crossbars to them in a couple steps. Note: If you don’t have trellis fittings, you will use 3 and 4 way fittings instead of the 4 and 5 way fittings.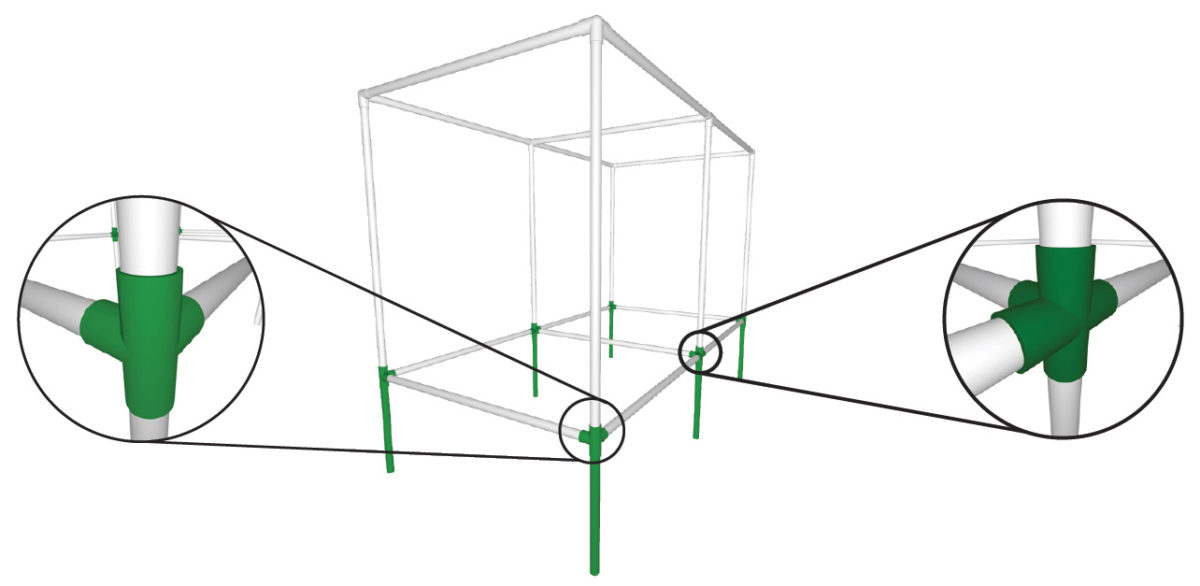
6. Use a metal File or sandpaper to smooth the bottoms of the legs. This helps to prevent accidental damage to the base of the fabric pot. If you don’t have a file or sandpaper, you can scrape the bottom of the legs on concrete.
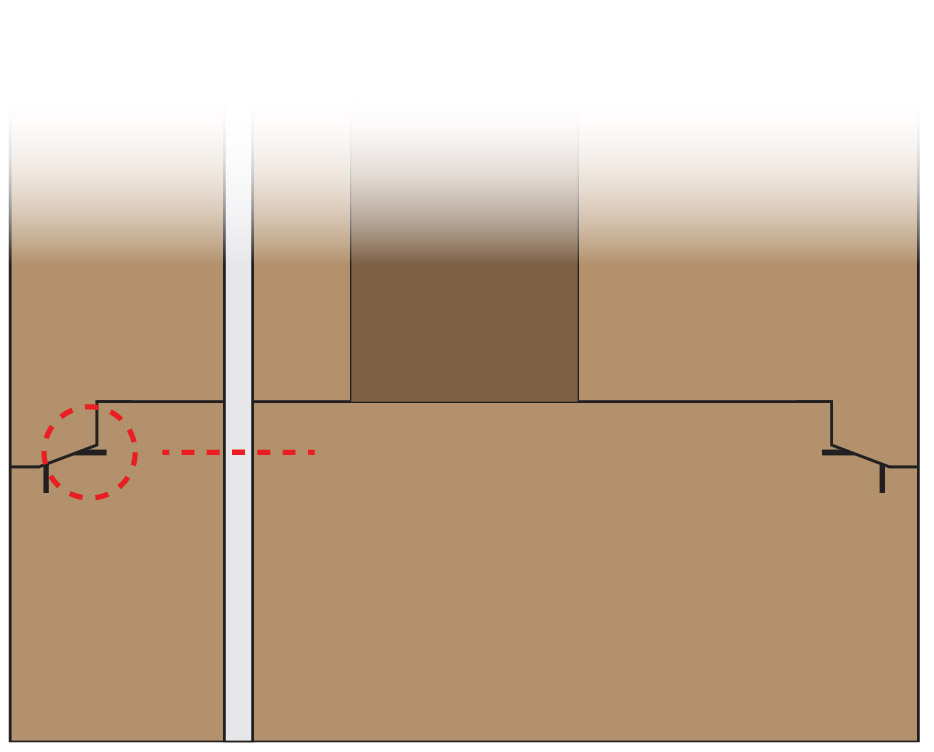
7. It’s time to cut the crossbars. Put a piece of uncut PVC through an end sleeve and cut at the vertical markings.
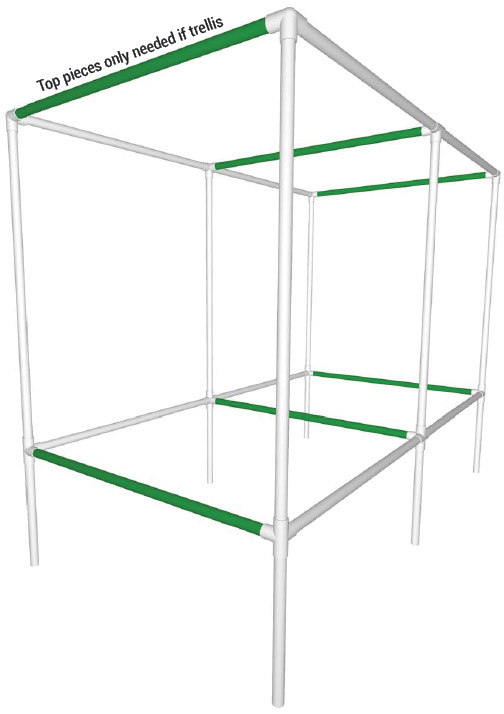
8. You can use this length to make as many crossbars as you need. The crossbars are the smaller length of your bed as well as the support bars that go across the middle of your bed for the 3×6, 4×8. The 4×16 bed will have 3 support bars.
*Please note, the 3×6 Double Trellis Raised Bed includes fitting for 2 support bars: One for soil level support and one for the either the first or second trellis (your choice).
9. Place the end crossbars into their sleeves and fit the corner legs and fittings onto them.
10. To begin assembling the sides, thread an uncut piece of PVC through an empty sleeve into a leg joint. Make sure the fabric is taut and cut at the first vertical mark. (In the shown illustration, the pipe continues left into the corner fitting. Do not pre-cut these side pieces. Measure them one at a time.)
11. Stick the next leg on and continue down the length of the bed until you reach the next corner joint.
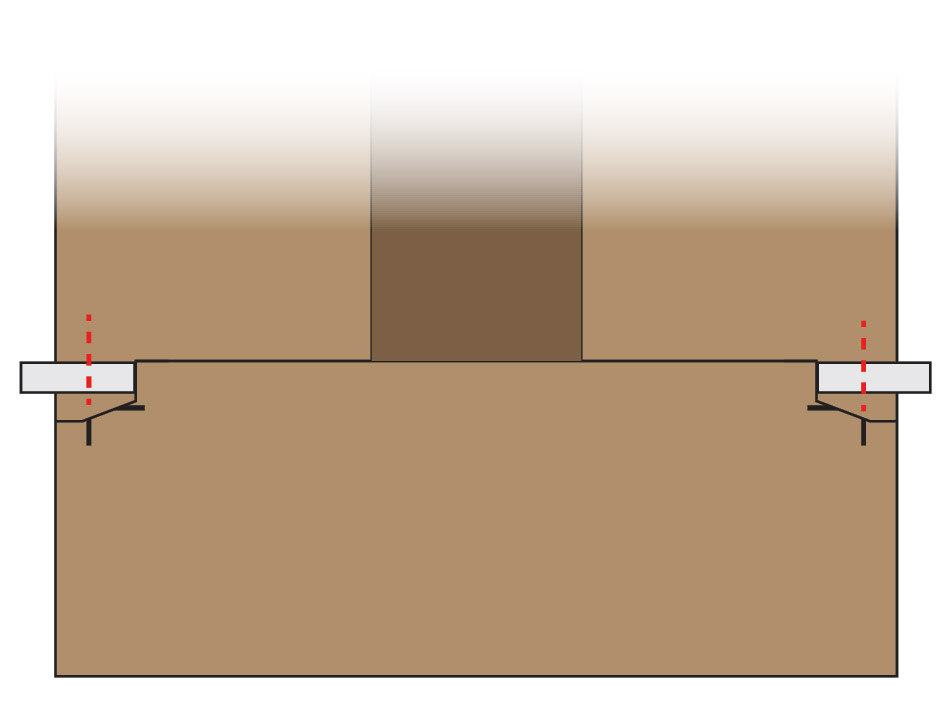
Over time, the bed base may expand and cause the PVC to pop out of the fittings. To prevent this, you can put screws through each pipe end and the fitting. Make sure not to over-tighten the screws! Putting the screws into the top of the fitting will allow gravity to help keep the screw in place.
Irrigation Kit options
For each size you have the option to add trellises (single or double), as well two different irrigation kit options
- Blusoak Irrigation: This system utilizes a Blumat carrot (sensor) to automatically water and monitor the moisture levels in your garden soil. BluSoak tape allows for even water distribution throughout. When coupled together with Blumat carrots, BluSoak hose only delivers water to your veggies when they need it, which promotes exponential growth and impressive yields. Your water source needs to be 6-10′ above the garden for a gravity system.
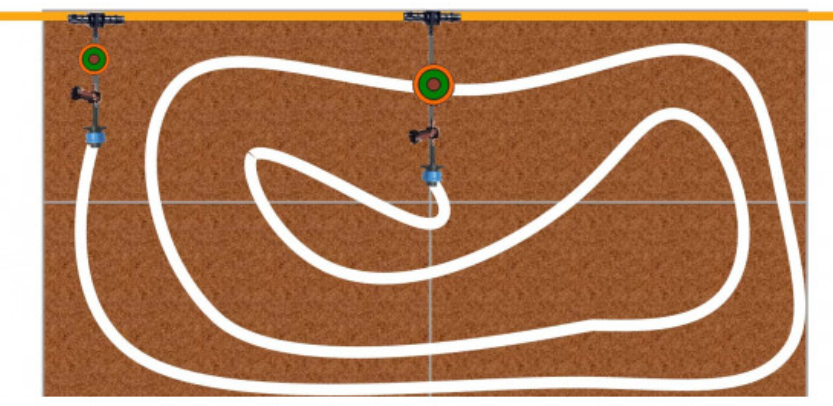
Above is the Midrange Blusoak kit. The economy kit is the same as the Midrange Blusoak kit, but only has one Blumat carrot as opposed to two.
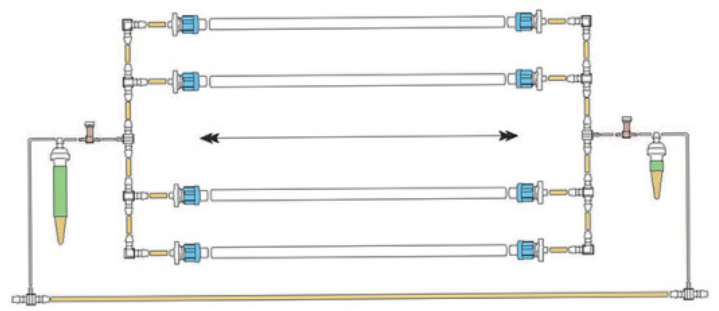
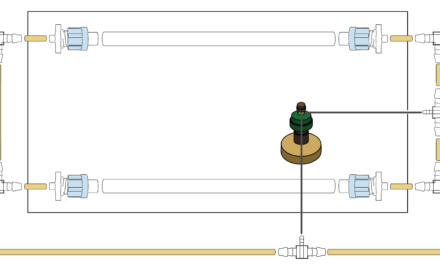
Pictured below is the Double Manifold kit
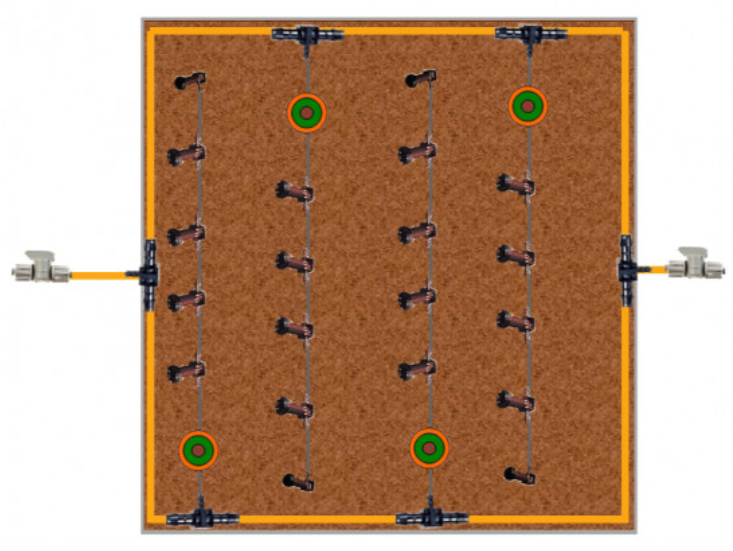
- Steensland Blumat Irrigation: This is a deluxe system which also uses Blumat carrots (sensors) to automatically water and monitor the moisture levels in your garden soil. However, there are more Blumat carrots in this system compared to the Blusoak system – which means your system will be better at sensing the water needs of your plants. Distribution Drippers are used instead of Blusoak, which allows for more targeted distribution of water throughout the garden bed. Also, your water source only needs to be 2′ above the garden for a gravity system.
Steensland Blumat Irrigation Kit pictured below
*If using any of our Blumat Irrigation Kits in a pressurized system running off a faucet or garden hose, simply add a Blumat Pressure Reducer.
Regular Raised Bed Kit vs. Living Soil Raised Bed Kit
Regular Grassroots Fabric Raised Beds are made of a breathable non-woven fabric that allows for excellent air pruning and drainage. Soil in fabric containers dries quickly, from the bottom and the sides, which is great for growing styles such as fertigation.
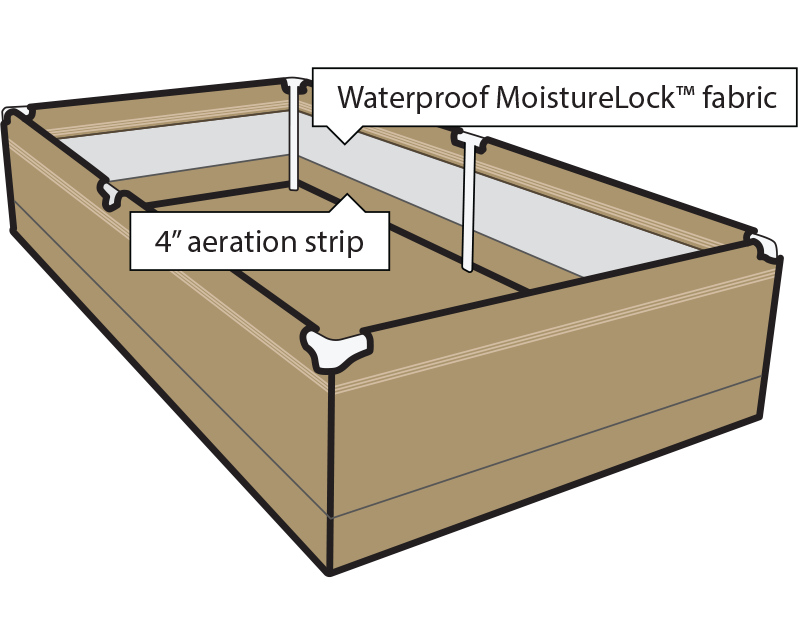
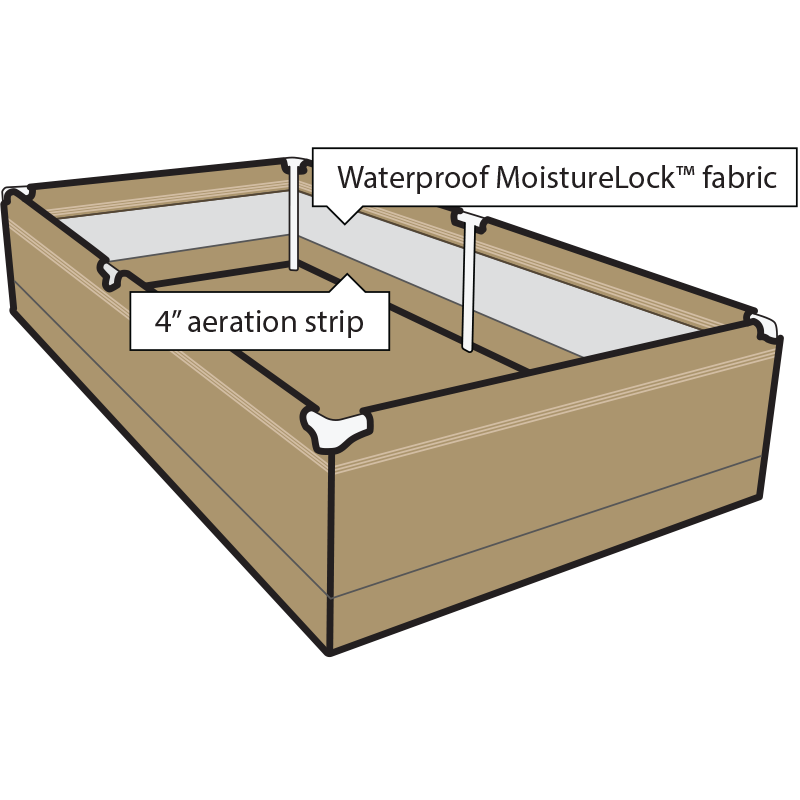
Drying soil quickly, however, is not how soil dries in nature. To mimic a more natural water draining process Grassroots has made the Living Soil Raised Bed Kits, which have a strip of MoistureLock, BPA-free waterproof fabric sewn to the inside of the container that provides many benefits:
- Directs water downward. This helps to avoid dry pockets in the soil.
- Promotes even moisture throughout the soil. Regular fabric pots dry from the sides. MoistureLock™ prevents that, simulating the way soil dries in nature. This helps the microbiology thrive.
- Less water usage! There is less surface area for water to escape the container, which means less water usage (lower labor) and lower humidity indoors.
- Aeration and air pruning comes from the strip of breathable fabric towards the bottom of the container.
Raised Bed Sizes
2×4 Fabric Living Soil Raised Bed
- Standard, Standard+Single Trellis Fittings, Standard+Double Trellis Fittings
- Standard+BluSoak Irrigation, Standard+Steensland Blumat Irrigation
- Standard+Single Trellis+BluSoak, Standard+Single Trellis+Steensland
- Standard+Double Trellis+BluSoak, Standard+Double Trellis+Steensland
3×6 Fabric Living Soil Raised Bed
- Standard, Standard+Single Trellis Fittings, Standard+Double Trellis Fittings
- Standard+BluSoak Irrigation
- Standard+Single Trellis+BluSoak
- Standard+Double Trellis+BluSoak
4×4 Fabric Living Soil Raised Bed
- Standard, Standard+Single Trellis Fittings, Standard+Double Trellis Fittings
- Standard+BluSoak Irrigation, Standard+Steensland Blumat Irrigation
- Standard+Single Trellis+BluSoak, Standard+Single Trellis+Steensland
- Standard+Double Trellis+BluSoak, Standard+Double Trellis+Steensland
4×8 Fabric Living Soil Raised Bed
- Standard, Standard+Single Trellis Fittings, Standard+Double Trellis Fittings
- Standard+BluSoak Irrigation, Standard+Steensland Blumat Irrigation
- Standard+Single Trellis+BluSoak, Standard+Single Trellis+Steensland
- Standard+Double Trellis+BluSoak, Standard+Double Trellis+Steensland
4×16 Fabric Living Soil Raised Bed
- Standard, Standard+Single Trellis Fittings, Standard+Double Trellis Fittings
- Standard+BluSoak Irrigation, Standard+Steensland Blumat Irrigation
- Standard+Single Trellis+BluSoak, Standard+Single Trellis+Steensland
- Standard+Double Trellis+BluSoak, Standard+Double Trellis+Steensland
Related Products
- Want to add a trellis onto your raised bed?
- Products that you might need that are not included in our irrigation kits

